NOTE: As an Amazon Associate, I earn from qualifying purchases. Learn More.

How to Make a DIY Solar Panel Charger
When solar panels were first introduced, they were primarily for large scale use for things like residences, office buildings, and power plants. Over time, technology improved to the point where solar panels became much more efficient, resulting in smaller panels.
As solar power become more accessible, the need for mobile power rose exponentially. Mp3 players, smartphones, cameras – all of these things require battery power that seems to never quit draining. If you have a smartphone, you definitely understand, as you probably spend a good part of your day charging your phone when you have the chance.
Mobile power banks have since been introduced, allowing for convenient charging when on the go. These are helpful and all, but they run out of charge as well. Once they are depleted, you’re on your own. Besides, they have to be charged from an external source, just like phones and other devices.
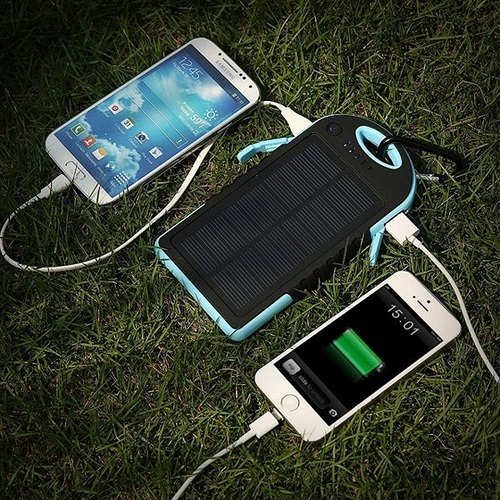
Solar panel chargers offer an easy and portable solution for charging your small devices on the go. It’s pretty simple: When their sun, there’s charging available. Plug your device into the cord coming from the panel, sit the panel in the sun, and you’ve got instant charging.
There are plenty of solar panel chargers available now, but making one yourself isn’t difficult at all. With just a few parts and a little time, you can have your very own portable solar charger to depend on during the day.
What is a Solar Panel?
Solar panels are what makes solar energy solar in the first place. The panels are mostly made from silicon cells that work to capture energy from the sun, and help convert it to actual electrical power.
The process isn’t all that complicated. The sun’s rays emit proton energy. Solar panels absorb the photons that come from the sun’s energy when they enter the solar panel, which causes the electrons to be disrupted from their orbits, and then released into the electric field that has been generated by the solar cells.
The cells in the panels then pull the electrons into a directional current. This process is known as the Photovoltaic Effect.
Now, if the panels are hooked up to a generator, they would keep going towards the battery, where they would then store up until being sent to an inverter, converted to alternating current, and sent out to AC outlets.
In the case of a solar panel charger, the direct current goes straight to the device being charge, or to a small battery pack, depending on the charger unit.
So, now that you know how it all works, it’s time to learn how to make a solar panel phone charger.
Instructions
Making a solar charger is incredibly simple, and requires some inexpensive materials and a few tools. The charger that you will be making doesn’t contain a battery pack, which means the electrical current from the solar panel is going directly to your phone.
Required Tools
- Hot Glue Gun
- Glue Stick
- 30w Soldering Iron
- Multi-Tool or Swiss Army Knife
What You’ll Need
- 6V Mini Solar Panel
- 5V Step-Up/ Inverter USB Charger Circuit
- Your Charger Cable
- Flexible and Foldable Plastic Card (Such as an old credit card)
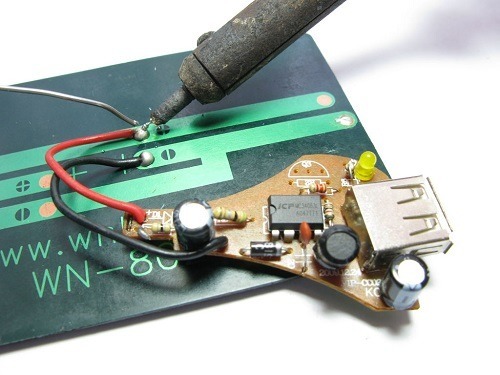
Step 1
Disassemble a USB charger (make sure it’s a 12v.) Cut the wires and be sure that they are short enough to mount to your 6v solar panel.
Using your soldering iron, solder the charge circuit to the solar panel. Using your glue gun, glue the charger to the end of the solar panel. Make sure that your USB port is not sticking out from the panel, or touching any leads.
Step 2
This part is optional, but recommended. You will be using your old card for a kickstand that holds the panel upright at an angle so you can face it towards the sun.
Take you card, and fold a small crease on one end. Fold it on the other end in the same direction, twice as big as the first fold.
Using your glue gun, glue the card to the back of the panel when it can stay up at an angle.
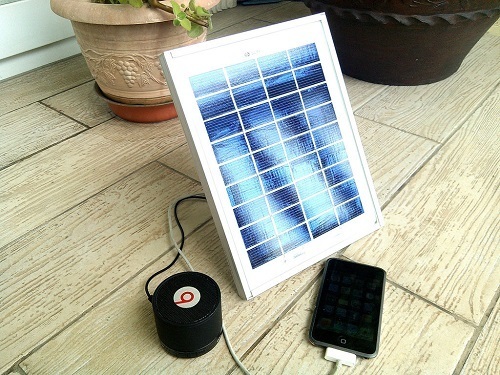
Your panel charger is now ready to use.
(Note, the power amount will effectively charge a phone, but it may have trouble charging a tablet sufficiently, even in unobstructed sunlight.)
How to Make a Solar Panel Battery Charger
You can use this same method to make a portable charger for rechargeable batteries.
Required Tools
- Soldering Iron
- Packing Tape
- Positive and Negative Wire
What You’ll Need
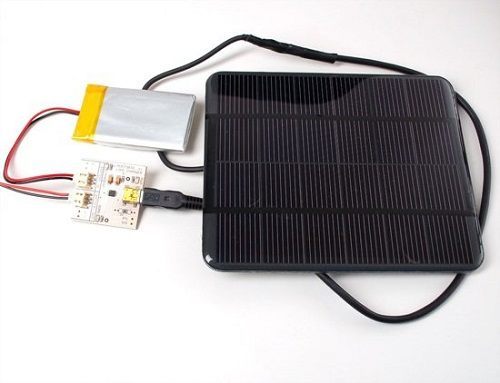
- Small Clear Tupperware Container (Slightly bigger than the solar panel)
- 6v Solar Panel
- AA Battery Holder
- Blocking Diode
- Rechargeable AA Batteries
Step 1
Begin by soldering your blocking diode to the positive wire on the battery holder. Follow this by soldering the other end of your diode to the positive tab on the solar panel. Now solder your battery pack’s negative wire.
(Be sure that the black bar on the diode is facing in the direction you want the power to flow, as this is a directional current.)
Step 2
Your panels are now ready to be attached to the lid of the tupperware. Take the lid, and place it on the ground with the inside facing up. Sit your panel into the lid facing down, and use your packing tape to affix the panel to the lid.
Sit your battery pack into the tupperware, close the lid, and you’re good to go.
Note: This charger is set up to provide a trickle charge to the batteries so that they don’t overcharge and get ruined. Because of this, allow yourself extra time for the batteries to charge while in the sun. The blocking diode will prevent the batteries from losing charge when the sun goes down, however.
If you wish to charge the batteries faster, you may include a second 6v panel in the setup by running wires on the positive and negative ends from one panel to another.
About the Author David Roberts
I'm a Mechanical Engineer who's obsessed with solar energy and sustainable living.
